Hi, I am Leo Liang.
Here in Sinriya, my world revolves around aluminum. As a core member of our Foshan decorative materials company, I have been years in the home renovation and building materials business. My passion lies in the function and the modern appearance of aluminum, especially our specialty decorative trims. I get to share the knowledge we’ve gained through our blog, social media, and direct interaction with architects and designers. There’s some satisfaction in bridging the gap between a great material and a perfect installation.
One question that comes up time and again, from both experienced professionals and eager DIYers, is how to achieve that perfect 45-degree miter joint. It sounds simple, but as many of you know, it’s the difference between an amateur finish and a truly professional, high-end look. A gapped or misaligned corner can potentially destroy an entire project’s integrity. So, today I’d like to walk you through the process we’ve refined, beyond the basics to share the nuances that guarantee an impeccable result every time. This is not a tutorial, but a method that has been derived from hundreds of projects and a deep respect for the materials we work.
Why Is a Perfect Miter Joint So Important?
In the world of architectural design and high-end interiors, details are everything. A miter joint isn’t just a way of fitting two pieces of trim together at a corner; it’s a statement of quality and attention to detail. When I speak with architects and designers of buildings, the finished look is always at the top of their list. A perfect, razor-sharp 45-degree corner on an aluminum tile trim or edge of a metal wall panel conveys a message of craftsmanship that adds value to the overall space. Conversely, a joint with a gap, no matter how small, can look like a mistake and take away from the overall look. Small errors in the angle quickly add up, and noticeable imperfections will occur. The problem is four times worse if you’re creating a frame with four miter joints because any error builds up, typically causing at least one corner to have an ugly gap.
Technically, the integrity of the joint is also compromised. For our B2B clients who manage large commercial or housing developments, durability cannot be compromised. A poorly executed miter joint on, for example, an aluminum floor transition strip can create a weak point. It can make the trim catch, lift, or become damaged over time by foot traffic or janitorial carts. The goal is a joint so tight that it appears to be one solid piece of material. Not only does this look tidier, but it also provides a tighter, longer-lasting installation that stops dirt and moisture ingress, something especially important in wet areas like bathrooms where aluminum tile edge trims are prevalent. It is this level of attention to detail in our quest for perfection that we obsess over every element, from material selection to the final cut.
How Do You Choose the Correct Aluminum Trim?
Before you even think about cutting, the road to a perfect miter joint begins with material selection. Not all aluminum is created equal, and the specific alloy and temper make a tremendous difference in how easily it may be cut. Here at Sinriya, we predominantly utilize 6063-T5 aluminum alloy. This specific grade is often referred to as an “architectural alloy” for a reason. It has excellent surface finish and corrosion resistance, but most significantly for our application, very good extrudability and machinability. The “T5” temper means it has been artificially aged and cooled from an elevated temperature to a condition that is best for machining without being excessively soft or “gummy,” which makes the saw blade gum up.
The form of the trim itself also dictates how you need to approach the cut. A simple L-shaped aluminum angle is easy enough. But more complex forms, like a square tube with a hollow interior or our own special decorative tile trims that include anchoring legs, require extra support while cutting to prevent deformation. Select a trim and consider its wall thickness. Thicker profiles, e.g., over 3/16-inch (about 5mm), can necessitate a blade of a different tooth count or a slower cutting rate than thinner profiles up to 1/8-inch (about 3mm). Check the trim for straightness before starting. While we are very proud of the quality of our extrusions, any slight bend or twist in the material will make it nearly impossible to achieve a perfectly flush miter joint. Lay the trim on a surface that you know is flat to check for any irregularities that need to be straightened before you begin.
What Are the Tools Required for a Precise Cut?
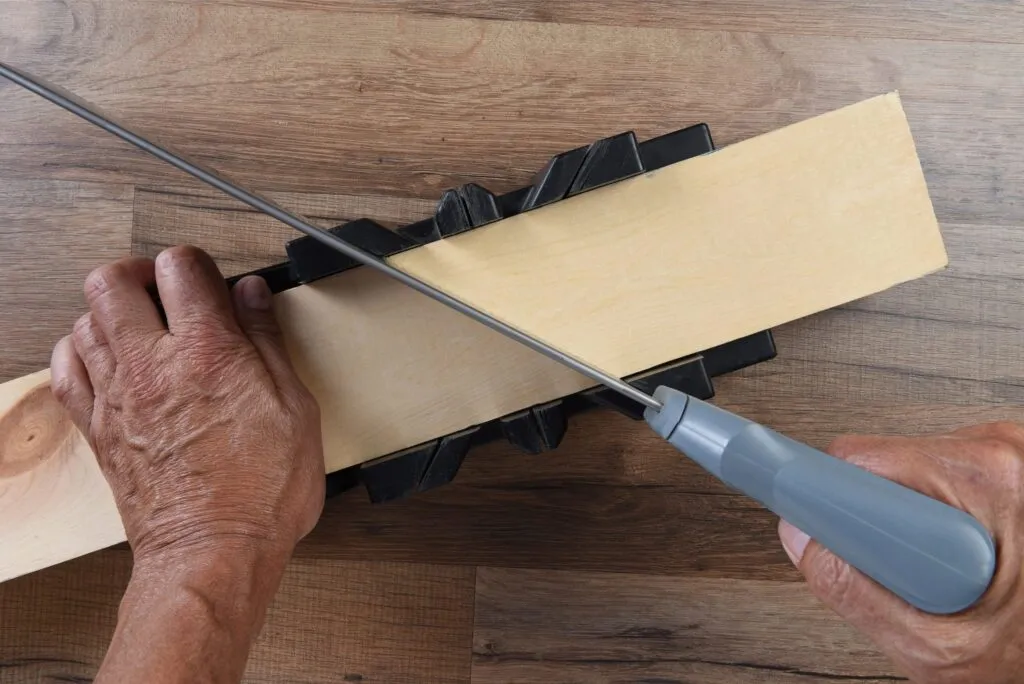
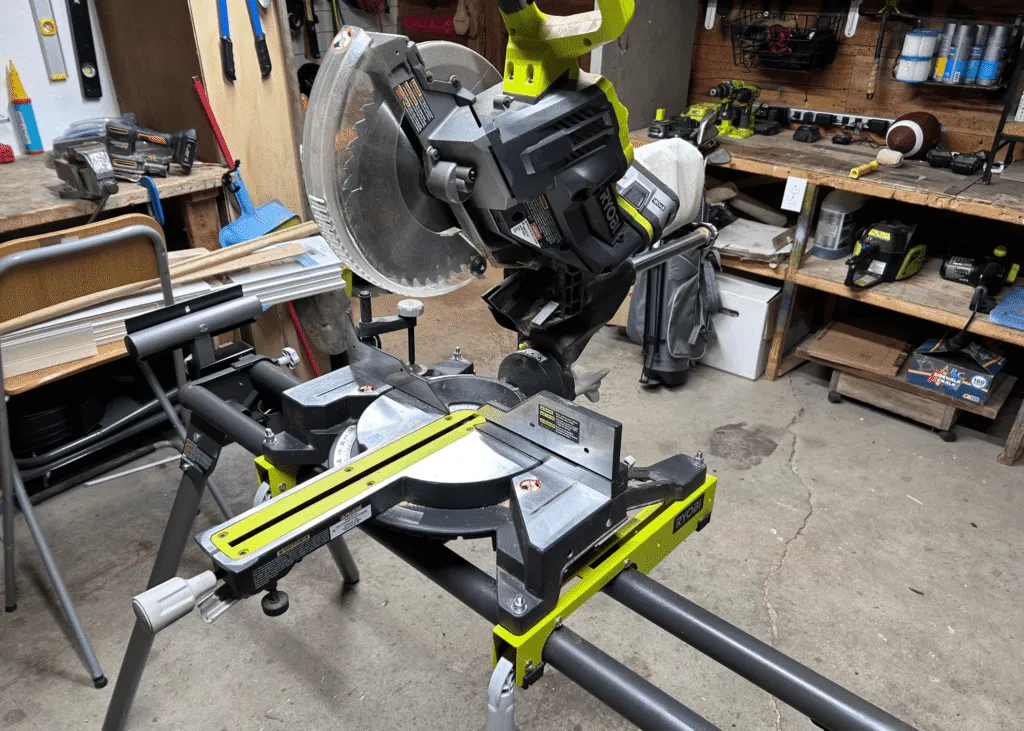
While a hacksaw and a miter box will do for a rough cut, architectural-quality precision demands a superior tool. My own choice, and the one we recommend to all of our professional clients, is a compound miter saw. However, the saw is only as good as the blade you put on it. You have to use a blade that’s designed to cut non-ferrous metals like aluminum. Look for a blade with a high number of teeth—80 to 100 teeth on a 10- or 12-inch blade, for instance. This gives a smoother cut with fewer burrs. Tooth geometry also matters. A Triple Chip Grind (TCG) tooth configuration is ideal, with a “roughing” tooth preceded by a “finishing” tooth that clears the path and leaves a clean, burr-free edge. A negative hook angle is another feature, which keeps the blade from being overly aggressive and “climbing” the material, providing a safer, more controlled cut.
Outside of the saw and the blade, there are a few more things that are essential. To start, a good, accurate measuring tape is a no-brainer. When it comes to marking your cut line, ditch the fat carpenter’s pencil. Instead, use a sharp utility knife or a fine-tip permanent marker to carefully score a straight line. This is the thin, accurate line that you will want to line your blade up with. Clamping properly is also important. Never hold the trim in place with your hand; it’s simple for the saw to knock it out of position. Clamp the aluminum trim firmly to the fence and base of the miter saw with the saw’s built-in clamp, or add extra clamps. This will prevent vibration and shifting, a prime cause of inaccurate cutting. Finally, safety equipment is not optional. Use safety glasses or a face shield, and hearing protection is a nice addition as well.
How Do You Master the Setup and Cutting Process?
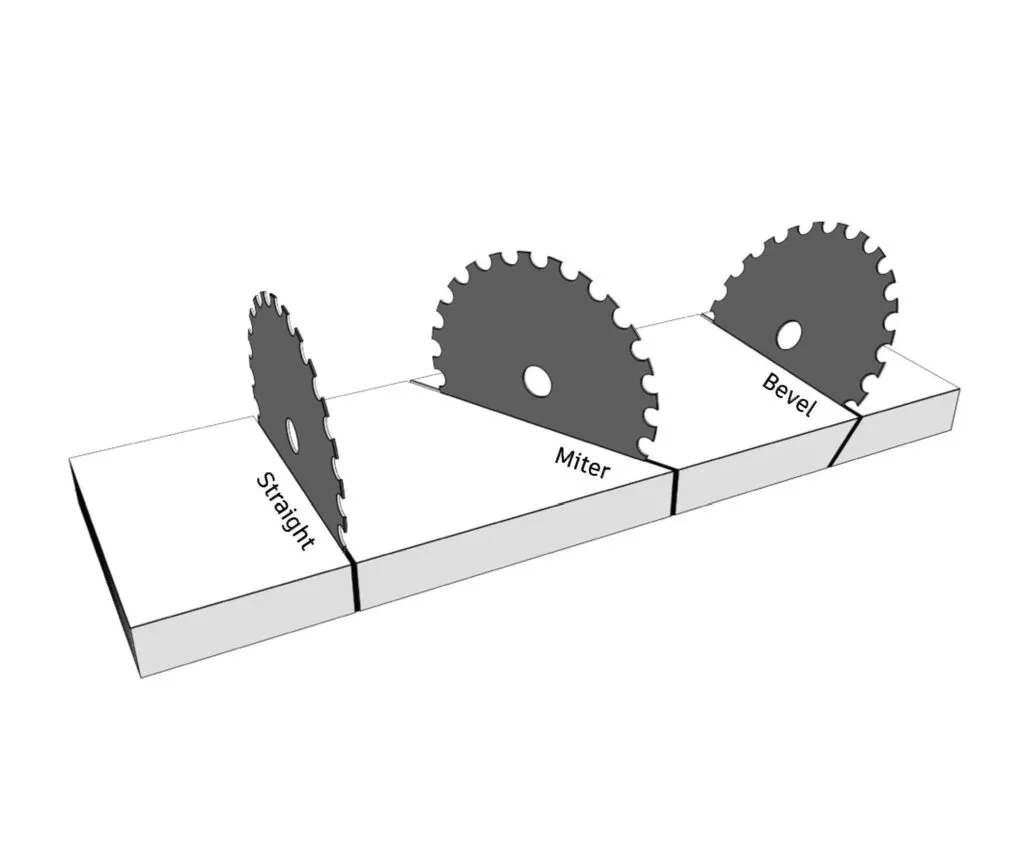
With the right materials and tools, the focus shifts to meticulous execution. The first step is to calibrate your saw. Don’t blindly trust the 45-degree detent on your miter saw. Use an accurate square to verify that your blade is at a perfect 90-degree angle to the fence, then set it to exactly 45 degrees, checking with a digital angle gauge if possible. Even a mistake of a half degree will result in an noticeable gap when the two pieces are joined. Once you have calibrated, make a test cut in a piece of scrap of the same aluminum trim. Join the two cut pieces into a corner and hold them against a square. This allows you to determine whether there are gaps and to make micro-adjustments to the saw’s angle before you cut your finished workpieces.
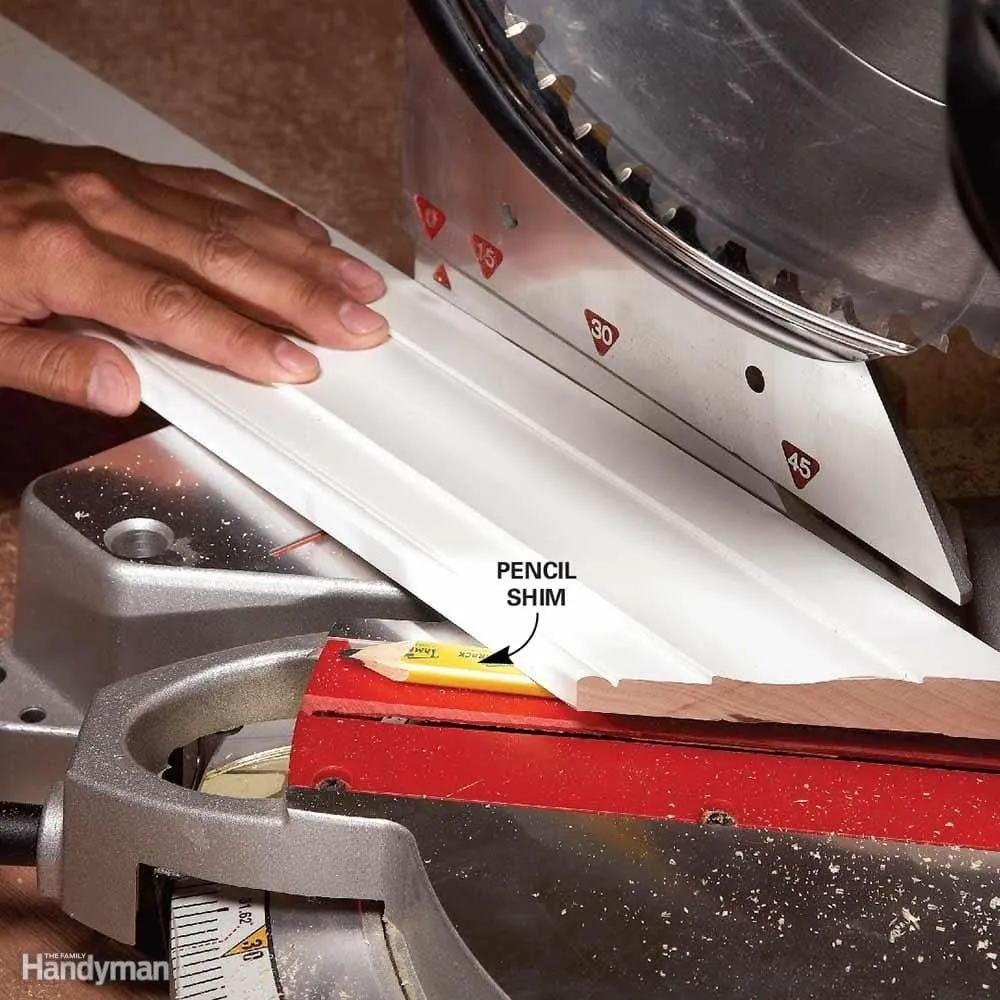
When you’re ready to cut, clamp the trim securely in place. Align the outside of a saw tooth with your cutting line—don’t bisect the blade on the line, or your piece will be short by half the blade width (the “kerf”). Start the saw and allow it to come up to speed before gradually lowering it through the material. Do not force the saw; let the blade do the cutting. The slow, steady plunge will result in the cleanest cut. For profiles that are not flat, like our ornamental trims, it is frequently helpful to set up a simple jig or use a scrap wood backer to provide additional support and prevent the trim from rolling or shifting during the cut. After cutting the first piece, you’ll turn the saw over to the second 45-degree angle to cut the mating piece, following the same procedure.
What Are the Most Common Cutting Mistakes to Avoid?
I’ve seen a few common, repeatable errors over the years that will lead to frustration and less-than-perfect miter joints. The most common is really the wrong blade. A standard wood-cutting saw blade, especially one with a low tooth count and a positive hook angle, will make a rough, jagged cut and is dangerous as it will catch the aluminum. The second largest trap is no clamping or incorrect clamping. Aluminum is a soft material, and the rotational energy of the blade can easily cause it to move or vibrate if not securely held, producing a beveled or irregular cut.
Another less obvious but crucial mistake is failing to account for the kerf of the blade. When you measure and mark your length, that mark is your finished dimension. You should place the saw blade to cut on the “waste” side of the line, preserving your accurate measurement. Sawing down the middle of the line will shorten the piece by half the kerf width, not much but enough to leave a gap in a four-corner frame. And try not to rush. Forcing the saw through the material too quickly will also lead to a rougher finish and can cause the blade to deviate slightly, altering the angle. Finally, a mistake that a lot of people make is failing to make a test cut on scrap material. Every combination of saw and blade will have its own subtle variations, and a trial on the same kind of scrap material is the only means of being 100% certain your setup is perfect before you start cutting into your completed trim that is expensive.
How Can You Fine-Tune the Joint for a Flawless Finish?
The cut itself is only half the battle. Even with a good blade and ideal setup, making a cut in aluminum will usually leave a small burr or sharp edge on the back of the cut. If this burr is left in place, the two mitered faces will not lie absolutely flat against one another, opening up a gap in the joint. This is where deburring enters the picture. The most suitable tool for this purpose is a basic hand-deburring tool or a small, fine-toothed metal file. Lay the file flat on the cut face and, with very light pressure, make a couple of light passes to remove the burr. Be extremely careful not to alter the 45-degree angle you just worked so hard to create. You should also lightly run the file over the sharp outside edges to soften them somewhat, which improves both safety and appearance. What you’re trying to achieve is a totally smooth, flat face on the cut.
After deburring, perform a “dry fit.” Put the two pieces of trim together to examine the joint. It should be tight and perfect. If you see any slight gaps, check that all burrs have been removed. Sometimes it’s a tiny, overlooked burr that’s the culprit. Once you’re satisfied with the dry fit, you can install. On most of our tile trims, the thin-set adhesive that you’re applying to the tile will also be the adhesive for the trim. In other applications, like wall framing or decorative paneling, a good-quality construction adhesive can be applied to the trim back. When putting the last joint together, a strip of masking tape can be placed to pull the two pieces tightly together while the glue is drying, holding the corner square.
What If Your Corner Isn’t a Perfect 90 Degrees?
In the real world of construction and remodeling, walls aren’t always exactly square. It isn’t unusual to come across inside or outside corners that are slightly more or less than 90 degrees. So what do you do when a 45-degree standard cut won’t do? The solution is simple geometry: you will have to bisect the angle of the corner. You first need to measure the angle carefully. The most appropriate tool to use for this is a digital angle finder since it provides you with an exact reading. Place the finder in or on the corner to obtain the exact angle, for example, 94 degrees.
To form a perfect miter joint on this corner, you must take the total angle and divide it by two. 94 divided by 2 equals 47. You would then set your miter saw to 47 degrees for both of the two pieces. This same rule holds true for any angle you come across. On an 88-degree corner, you would set your saw to 44 degrees. This is a necessity for professional trim installers that must adapt to the conditions of a job site. Always measure the corner before you cut. Assuming all corners are a perfect 90 degrees is one of the fastest ways to lose material and be left with frustrating gaps in your work. By measuring and dividing the actual angle, you’re assured a tight, custom fit every time, regardless of the wall’s unevenness.
How Do You Handle Ornate Profiles and Shapes?
L-trims are simple, but what about U-channels, hollow rectangular tubing, or even the custom decorative profiles we produce here at Sinriya? These shapes represent a unique issue in that their integrity can be lost in the cut. The success secret is to provide internal and external support. For a hollow tube, here’s a simple yet effective method: Cut a piece of scrap wood to fit within the profile. This internal support prevents the walls of the tube from collapsing or vibrating under pressure from the saw blade, creating a clean, square cut.
With open profiles like a U-channel or T-trim, the goal is to prevent the piece from twisting or bending. That’s where the creation of a custom jig or backer board comes in handy. By sketching the profile on a piece of scrap plywood and cutting it out, you can create a ideal “cradle” to support the trim securely in its natural curve. Clamp the trim in this cradle, and then clamp the assembly to your miter saw. This method keeps the trim absolutely stable and perpendicular to the blade for the entire cut. It is an extra step, but with complex, high-value profiles, it is the only way to be certain of the accuracy that our design and architectural customers demand. Taking the time to properly back the material is a hallmark of a professional craftsman and is key to creating the flawless finish that will mark a professional project.
The ideal miter is a craft that is a marriage of the correct technique, the correct tools, and a slow and steady methodology. It’s a skill that brings an installation from functional to exquisite. It’s a philosophy that we live by at Sinriya, providing not just quality aluminum trims but also the expertise to ensure they are put to their best use.
If you’re an architect, interior designer, or construction professional looking for aluminum trim products and the technical support services to back them up, we’re here to help. We’re experts in the architectural application of aluminum trim. Please don’t hesitate to call us with questions or for a consultation on your next project.
References:


retro bowl unblocked
Howdy this is somewhat of off topic but I was wondering if blogs use WYSIWYG editors or if you have to manually code with HTML.
I’m starting a blog soon but have no coding experience so I wanted to get guidance from someone with experience.
Any help would be greatly appreciated!
Sinriya
We have a professional operation team, I can recommend people to you, you need to be able to add me whatsapp 86 18000886327
penalty kick online
I’ve been exploring for a little for any high-quality articles or blog posts in this sort of house .
Exploring in Yahoo I ultimately stumbled upon this web site.
Studying this information So i’m happy to express that I’ve a very just right uncanny feeling I
came upon exactly what I needed. I most unquestionably will make certain to don?t disregard this site and provides
it a glance on a continuing basis.
Sinriya
Thank you for your recognition! For business cooperation, please contact our business manager via WhatsApp: +86 18000886237